
In this article
You’re standing over two vests. One has a rescue belt across the ribs, costs noticeably more, and looks like what the guides wore on your last trip. Every instinct says the serious one is the safer one.
Swiftwater instructors say the opposite, and they say it flatly: that belt belongs to people trained to use it, and on anyone else it’s a hazard they paid extra for. This guide covers what a rafting PFD actually has to do, how to make it fit, what’s worth buying if you’re a private boater, and when to retire the one already hanging in your garage.
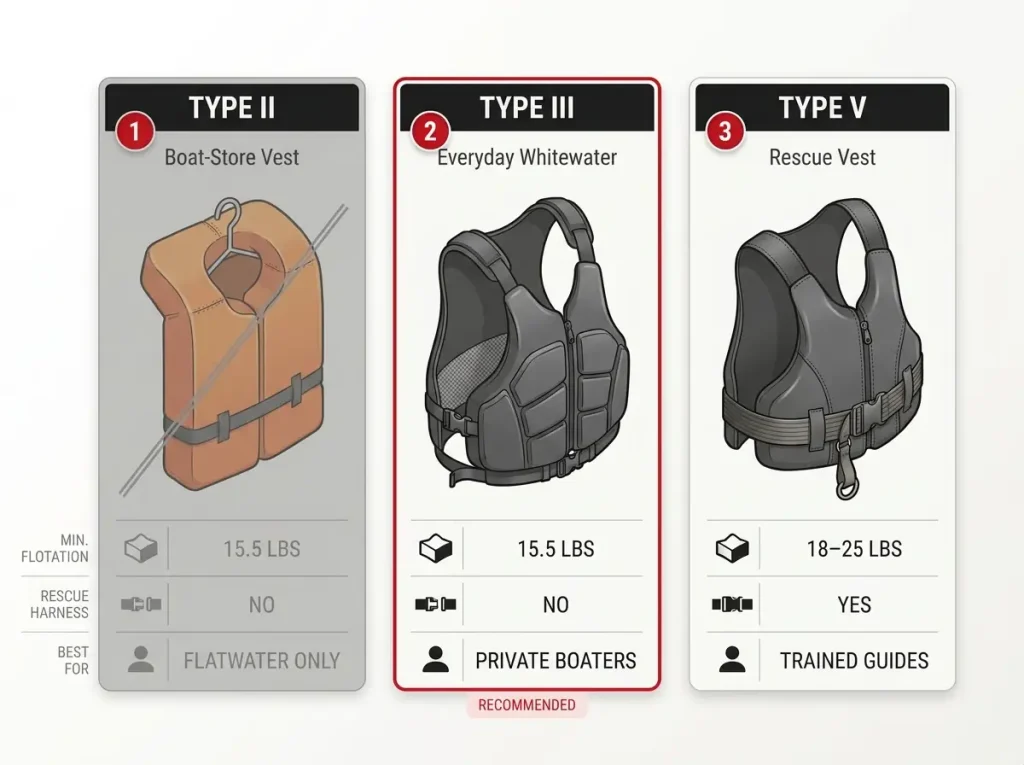
Here’s how the three types you’ll actually run into stack up, and who each one is really built for.
| PFD Type | Flotation | Who It’s Actually For |
|---|---|---|
| Type III paddling vest | 15.5 lbs minimum | Nearly every private boater and weekend rafter, through Class IV |
| Type V rescue vest | 18–25 lbs typical, plus a quick-release harness | Working guides and boaters with swiftwater rescue training |
| Type II boat-store vest | 15.5 lbs minimum | Flatwater only. Not built for active whitewater use. |
What Type of PFD You Actually Need for Rafting
Everyone reads the type number as a ranking. Bigger number, better vest. It isn’t a ranking. It’s a job description, and the job the Type V PFD was built for probably isn’t yours.
The number describes what a personal flotation device is designed to do and who is supposed to be wearing it. Get that straight before you compare a single strap or foam panel, because it settles about eighty percent of the decision on its own.
Type III, the Everyday Whitewater Vest
A Type III PFD has to provide a minimum of 15.5 pounds of flotation. That’s the everyday whitewater vest, and it is what almost every private boater reading this should be wearing.
Type III is not the entry-level compromise the category sometimes makes it look like. It’s the correct tool for a paddler running Class III and Class IV water in a raft. The foam is cut high so it clears your stroke and lets you haul yourself back over a tube.
Nothing about running harder water outgrows it. Training does, eventually, and training is a different purchase.
Type V and the Fine Print on the Rescue Belt
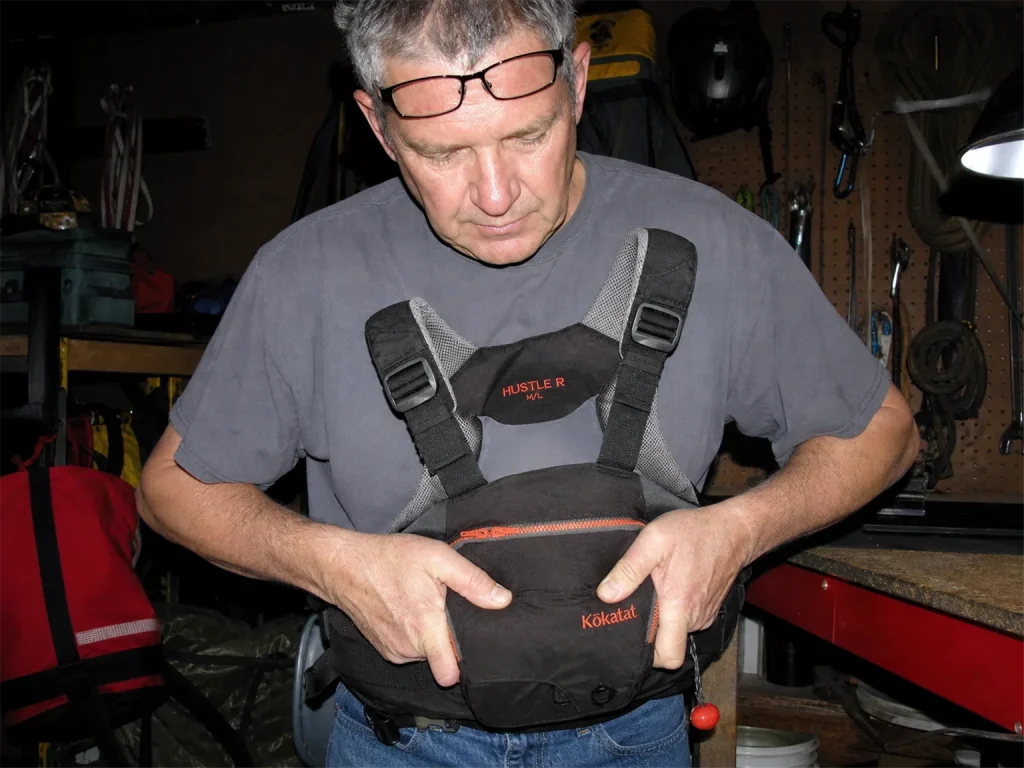
Type V paddling and rescue vests typically carry 18 to 25 pounds of buoyancy, plus the thing that actually defines them: a quick-release rescue belt wrapped around the ribs.
That extra foam is real. It is also not why guides wear these. They wear them for the harness, because their job involves clipping themselves to a rope in moving water on purpose.
If that sentence doesn’t describe something you’ve been trained to do, the harness isn’t a feature you’re buying. It’s one you’re carrying.
What Coast Guard Approved Really Certifies
Here’s where people get quietly misled. US Coast Guard approval certifies the flotation and the construction of a jacket. It does not certify that the jacket suits whitewater.
A Type II boat-store vest is Coast Guard approved and still the wrong thing to wear in a rapid. Approval is a floor, not a fit. If you want the primary source rather than a retailer’s paraphrase of it, the Coast Guard’s own PFD selection, use, wear, and care guidance lays out the Type I through Type V classification and the minimum flotation figures without anyone trying to sell you a vest at the end of it.
This is the same class-by-class logic we use for picking a whitewater helmet for the water you actually run: match the gear to the river in front of you, not to the river you’re imagining.
Why the Flotation Number Matters When You’re Swimming

Nobody buys a PFD imagining the swim. They imagine sitting in the boat, looking capable. The number on the label only means something in the thirty seconds you’re on your back in a wave train trying to get air.
American Whitewater has been blunt about this for decades. Their Safety Code, which names a missing PFD as the leading contributing factor in paddlesports fatalities, puts the biggest fix first: wear one, snug, every time. Optimizing which one comes a distant second to that. But once you’re wearing one, the pounds start to matter, and here is what they’re actually doing.
The Defensive Swim Position and What Holds You There
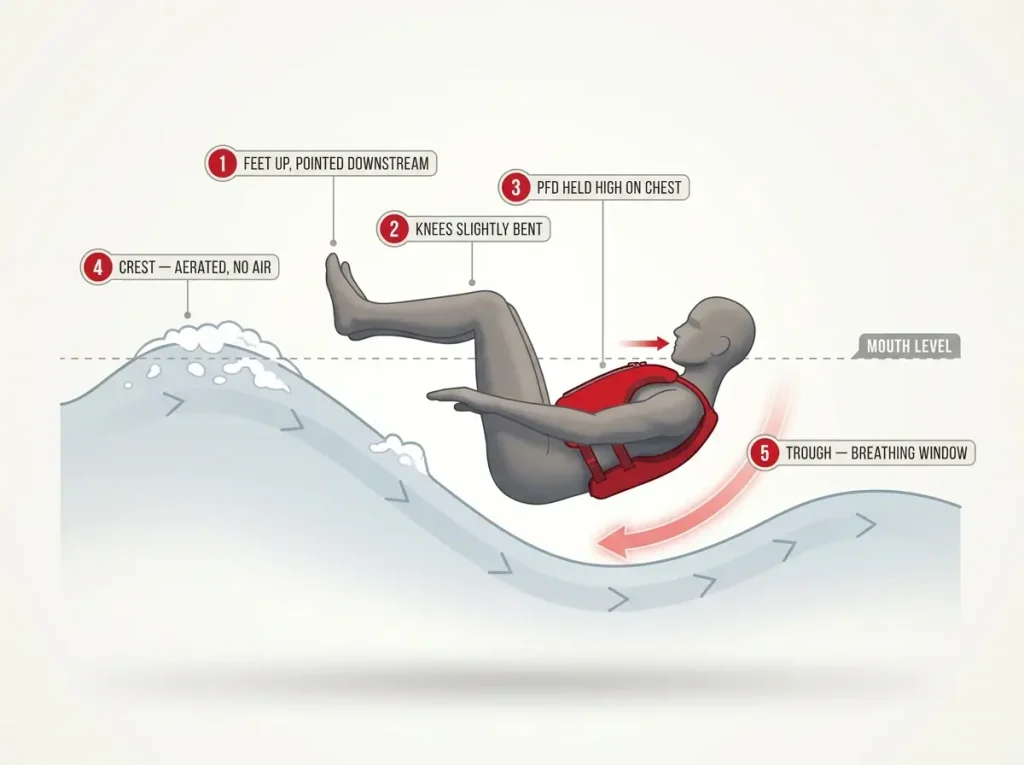
The defensive swim position is on your back, feet up, toes pointed downstream, knees slightly bent so your legs absorb a rock instead of your spine. That position is the whole reason the foam is there. Buoyancy is what lets you hold it instead of tumbling.
A swimmer who can’t stay on the surface can’t stay oriented, and a swimmer who can’t stay oriented is going through the rapid feet-down, which is how feet find cracks. The position is also about minimizing drag: on your back with your feet up, you present a narrow profile to the current and skate over things instead of catching on them.
The foam isn’t buying you comfort. It’s buying you the ability to point yourself the right way and keep pointing that way while the water tries to spin you. If you want the technique itself rather than the spec behind it, the full defensive versus aggressive swim breakdown is the next thing worth reading.
Breathing in the Troughs, Not the Crests
This is the part almost nobody explains, and it changes how you read the whole spec sheet.
In a wave train, your breathing window is in the troughs, not at the crests. The crest is aerated water and spray. The trough is where there’s something solid enough to float in and air above it.
Flotation that holds your chin clear in the trough is flotation doing its job. Flotation that only holds you up in flat water is a number on a tag.
That’s the practical translation of the 15.5 pound minimum. It isn’t “will this hold me up in a lake.” It’s “will this hold my mouth above the water in the low spot between two waves, while I’m cold and out of breath and not thinking clearly.”
In a swim, actively shove the vest up high on your chest, near the collarbone, and hold it there. The flotation only works where you put it, and a vest that has slid down to your waist is holding your stomach up while your chin goes under. Guides do this reflexively. Everyone else has to be told once.
The Trade-Off Nobody Mentions
More foam is not linearly more safe, and this is the nuance no competitor states plainly.
The same buoyancy that keeps your airway clear in a normal swim fights you the moment you’re trying to free a foot that’s found a crack. You need to get down to it, and there’s twenty-plus pounds of foam insisting you go up. That’s not an argument for buying less flotation. It’s an argument for understanding that the number is a trade, not a score, and for not assuming the vest with the most foam is automatically the vest that keeps you safest in every situation you might land in.
What Separates a Rafting PFD From a Boat-Store Life Jacket
The orange horseshoe-collar vest in your garage is Coast Guard approved. It’s also built for somebody sitting in a bass boat who might go over the side once, on a lake, on a calm day. It’s the wrong tool the second the water starts moving.
The Type II Trap
Every roundup naming a cheap “budget PFD” eventually points at a Type II boat-store classic, and it’s a bad call. The Stearns Adult Classic is the one that keeps getting named, and it’s a Type II: bulky, built for calm water, and not designed for the kind of active use a rapid demands. That’s the real budget trap in this category. It was never a cheap Type III.
The BoatUS Foundation’s breakdown of life jacket types walks through what each type is designed around, and it’s a nonprofit rather than a store, which is why it’s worth reading before you take a retailer’s word for it.
Features Built for a Raft
A rafting vest is cut for the stroke. High-cut foam, articulated panels, nothing binding across the shoulders when you reach.
Then there are the boat-specific details, and the clearest one is the mesh lower back. A raft’s seat has a high back. A vest with a full foam back fights that seat all day, and you feel it by hour three.
A mesh back doesn’t. It’s the sort of thing nobody mentions in a spec list and everybody notices on a long float.
The rest of your kit lives on the vest too: a lash tab where your river knife rides, sheath-first, and a pocket or attachment point for a pealess whistle rigged snag-free. Rafting vests also carry grab handles at the shoulders, which exist for exactly one reason: so somebody can haul you over a tube without tearing the vest off you. A boat-store vest has nowhere to put a knife and nothing to grab.
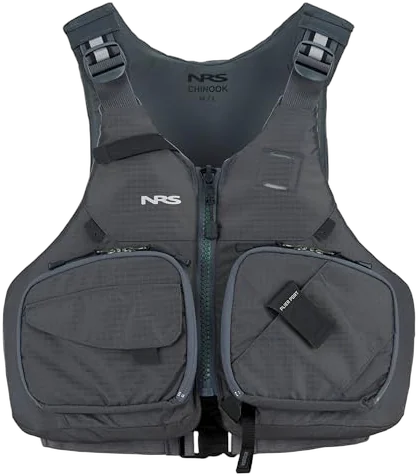
The NRS Chinook is a fishing vest by marketing and a raft vest by construction. The mesh panel across the lower back is the whole argument: it clears the seat, it vents, and it turns a vest you tolerate into a vest you forget about. The pockets are genuinely useful if you fish, and mildly redundant if you don’t. Sixteen and a half pounds of flotation puts it a hair above the Type III minimum, which is a nice place to be without paying for a harness you won’t use.
Sit in the boat with the vest on before you commit to it, not just standing in the shop mirror. A full-foam back that feels fine on your feet turns into a wedge between your shoulder blades and the seat back the moment you sit down and start rowing. Ten seconds in a seat tells you more than ten minutes in front of a mirror.
Durability for Daily Abuse
A rafting vest lives a rough life. It gets stuffed under a thwart, dragged across gravel, cinched over a drysuit, and left in the sun on the tube while everyone eats lunch.
That’s why the shells run heavier, usually 400D nylon or a Cordura weave, and why the webbing and hardware on a river-specific vest is chunkier than what you’d find on a lake jacket. You’re not paying for toughness because rafting is rougher on people. You’re paying for it because rafting is rougher on gear.
Fit Is the Part Everyone Gets Wrong
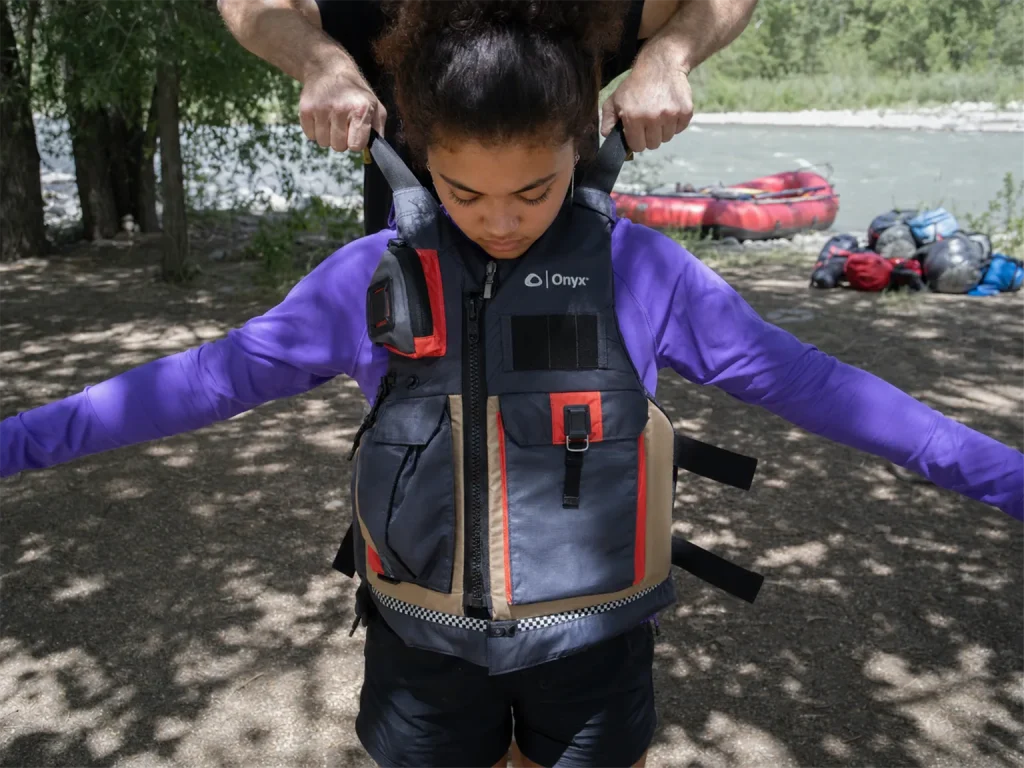
The vest that rides up over your chin mid-swim usually isn’t the wrong vest. It’s the right vest tightened in the wrong order, by somebody who started at the shoulders because that’s where the straps are easiest to reach.
The Strap Order That Actually Works
There is a sequence, and it is the whole trick:
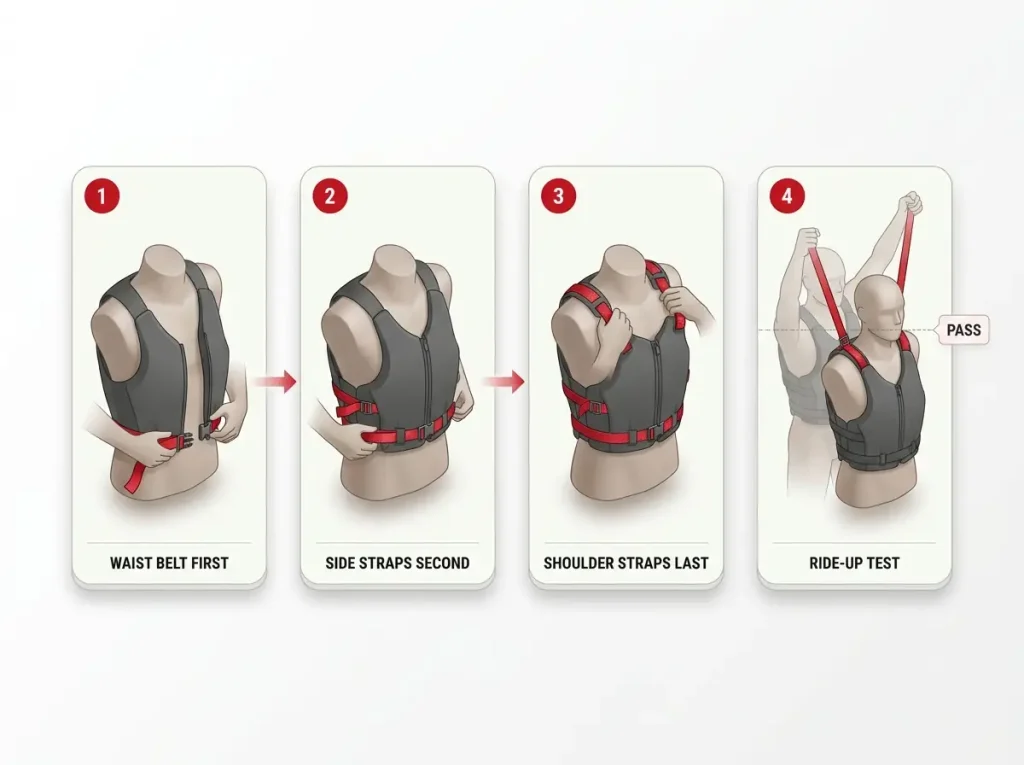
- Waist belt first. This sets the vest’s position on your torso.
- Side straps second. These snug the fit around your ribs.
- Shoulder straps last. These only take up whatever slack is left.
Start at the shoulders and you never lock in the torso position, which means the vest has somewhere to travel when the water pulls on it. Start at the waist and it doesn’t. That’s it. That’s the difference between a vest that stays put and a vest that ends up around your ears in a hole.
The Ride-Up Test
Thirty seconds, one friend, at home, before it matters.
Cinch the vest down completely. Have someone stand behind you and pull straight up on both shoulder straps, hard. If the vest travels past your chin, it’s the wrong size or the wrong fit, and no amount of strap-fiddling is going to fix it. If it stays put and lifts you slightly instead, you’re good.
Ask around and the same story keeps surfacing: somebody runs this test for the first time years into owning a vest, and finds out it never fit. The vest looked fine. It was the right brand. Nobody had ever pulled up on it.
Fit Changes When You Layer
Here’s the part that catches people in spring. The fit you dialed in during July is not the fit you have in April.
Put a drysuit or a wetsuit under that vest and everything moves. The torso gets thicker, the straps run shorter, and the vest sits differently on your chest. That’s the exact moment the water is cold enough that a bad swim gets serious fast. So once you’re layering for cold water rafting, re-cinch in the same order and run the ride-up test again, in the layers you’ll actually be wearing.
Run the ride-up test on the first cold-water day of the season, in full layers, before you launch. Not in the garage in a t-shirt. A vest that passes over a base layer can fail over a drysuit, and the drysuit day is the one where it counts.
Women’s Fit and Why a Unisex Vest Rides Up
Every roundup names a women’s model and moves on, as though the difference were the color. The difference is seam geometry, and it’s the exact thing that decides whether the vest ends up under your chin in a swim.
Princess Seams vs the Flat Two-Panel Cut
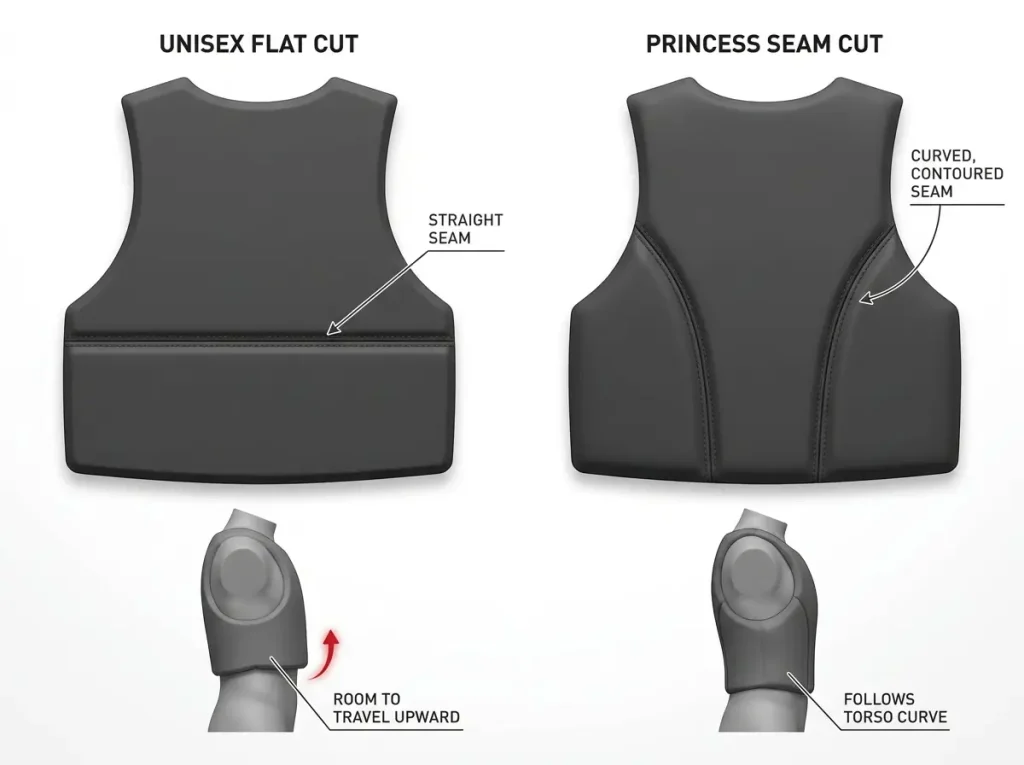
A unisex vest is built as a flat two-panel sandwich. Two slabs of foam, a seam running straight across, pressed flat against a shape that isn’t flat. That’s not a fit problem in the abstract. It’s a mechanical one: a panel pressed flat against a curve has to go somewhere, and the direction available to it is up.
A hinged princess seam is a multi-panel cut with curved seams that wrap around your torso instead of pressing across it. Women’s-specific PFDs add contoured inner chest cups and, on the better ones, a shortened-torso option. This isn’t marketing. It’s the reason the same nominal size behaves completely differently on two people.
Torso Length Is the Real Variable
Here’s the thing that surprises people: chest size is usually not what’s causing the ride-up. Torso length is.
A shorter torso in a unisex vest means the foam has more room between the waist belt and your chin than the design assumed. That’s the classic ride-up setup, and it’s why a vest can be the “right size” on paper and still fail the test from the section above. Run the ride-up test and it settles the question in half a minute, regardless of what the label promises.
One honest flag while we’re here. The Astral Layla is the model nearly every competing roundup names for this, and it’s currently unavailable across every listing we checked, in every color and size. If you’re following an older article, that’s why the link goes nowhere. The live equivalent, with the same construction logic, is the Stohlquist Flo.
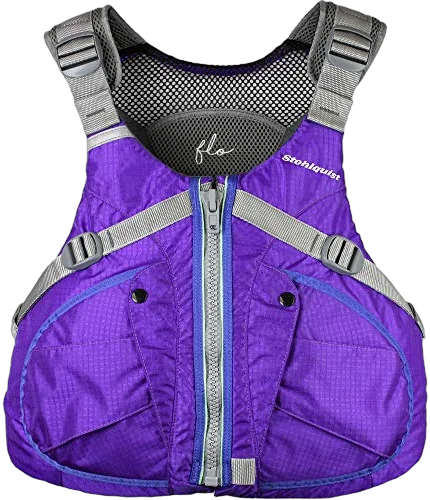
The Stohlquist Flo is a Type III built around the two things that actually matter here: a torso that’s short by design rather than by adjustment, and contoured inner cups that let the foam sit against a curve instead of bridging across it. The high-back flotation keeps it clear of a raft seat, and eight adjustment points give you somewhere to go when the first setup isn’t right. It won’t fix a vest that’s genuinely the wrong size, and nothing will. Run the ride-up test on it like you would on anything else.
Worth knowing: the same fit problem shows up one layer down, which is why our drysuit picks cover women’s fit rather than just listing a women’s SKU and moving on.
Honest Picks for Private Boaters
This is the section the title promised. Two vests cover almost everybody reading this, and neither one has a rescue belt on it.
The Budget Pick That’s Actually Whitewater-Rated
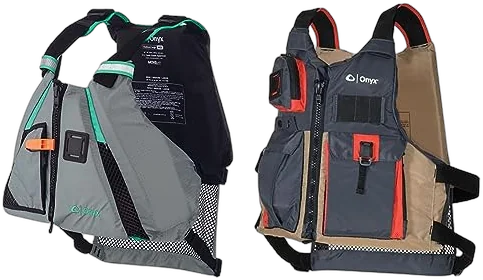
The Onyx MoveVent Dynamic exists in this article to make one point: the cheap end of this category is honestly fine, as long as you buy the right type. This is a real Type III with the 15.5 pound minimum, mesh venting so you’re not cooking on a July float, and enough adjustment to make it fit properly.
What it isn’t: as soft as the mid-range vests, or as refined in the foam layout. You’ll notice on a long day of paddling. You will not notice in a swim, because the flotation is the flotation. If money is the constraint, this is where to spend it, and the vest you skip buying is the Type II your neighbor swears is the same thing.
The Mid-Range Vest That Doesn’t Fight Your Stroke
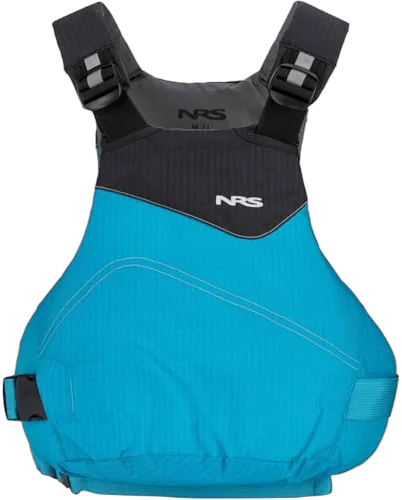
The NRS Vapor is where most private boaters should land, and the reason is boring and correct: it fits better and it doesn’t fight you. Six soft foam panels articulate around your ribs where a two-panel vest just clamps. That’s mobility, not luxury. “It restricts my stroke” is the most common complaint about wearing a PFD, and this is the direct fix for it.
The 400D nylon shell handles being dragged across gravel and left in the sun. There is no rescue belt on it, which is the point. If you’re a private boater running Class III and IV, this is the end of the line, not a stepping stone toward something with a harness.
The Rescue Belt and Who Actually Needs One
The belt is not a fancier buckle. It’s a tether release for somebody who has deliberately clipped themselves to a rope in moving water.
What a Quick-Release Belt Actually Does
The mechanism is simple enough to describe and unforgiving enough to respect. A loop of cam webbing runs around your ribs, closed by a quick-release buckle with a pull-cord and a high-visibility ball on the end. A metal O-ring rides on the webbing, and that O-ring is what a tow line clips to.
The whole design exists so that a rescuer who gets pinned or tangled on that rope can yank the cord and be free of it in about a second. That’s the entire promise: you can undo your connection to the rope under load, fast, with one cold hand.
Why Untrained Hands Make It a Hazard
Now the part the roundups skip. Everything above assumes you meant to be attached to a rope.
Untrained, the belt is a loop of webbing and a metal ring on your chest in an environment full of ropes, straps, and things that catch. It’s not a bonus feature that sits inert until you need it. It’s a system, and the training is the part that makes it a system rather than a snag.
The consistent advice from swiftwater rescue instruction is the same every time: don’t own the belt until you’ve taken the course. A private boater is better served by a well-fitted high-end Type III, full stop. It’s also worth knowing that the belt assumes the rest of a rescue kit is on the boat and that somebody knows how to use that too.
Big water is its own separate question, and worth untangling from the harness one. Genuinely huge water is a case where extra flotation earns its keep on its own merits, and a vest like the NRS Big Water V is built around exactly that. Note what’s happening there: you’d be buying the foam, not the belt. Those are two different purchases that happen to live on the same shelf.
You see the confusion play out on forums constantly. Somebody asks what to replace their dying vest with, gets fifteen brand-loyalty answers back, and nobody asks the only question that matters: do you actually need the harness, or do you just want the vest the guides wear?
If you do own a rescue vest, pull the release cord cold, in the water, with gloves on, at the start of every season. Not on the lawn. A buckle that releases beautifully in your garage and hangs up under load with numb fingers is worse than no belt at all, because you’ve planned around it working.
The Rescue Vests Worth Your Money If You’re Trained
If you’ve done the course and the belt is a tool you actually use, these are the three worth looking at.
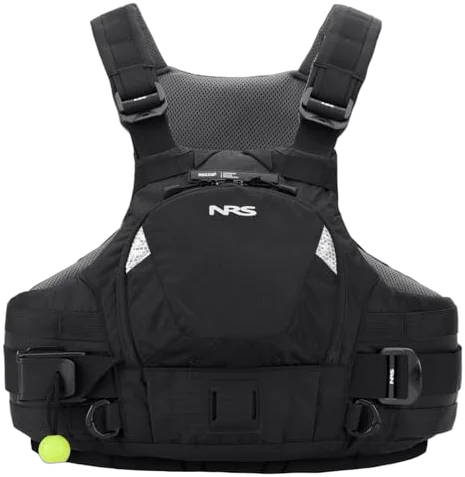
The NRS Vector is the one to know about if you’ve been reading older PFD roundups, because most of them still recommend the NRS Zen and the Zen has gone quiet across every listing we could find. The Vector carries the same feature set forward: a proper quick-release harness, around 17.5 pounds of flotation, and side entry that means the fit survives being taken on and off all day.
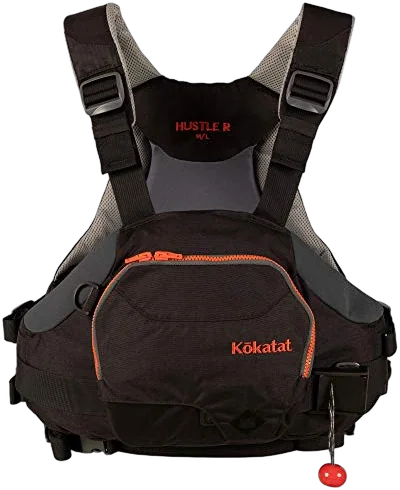
The Kokatat Hustler Rescue is the Kokatat option in this slot, and Kokatat’s reputation is built on gear that survives being used hard for years rather than on spec sheets. Worth flagging: the Maximus Centurion, which nearly every existing roundup names as the Kokatat rescue pick, came back unavailable on every listing we checked. This is the one that’s actually there.
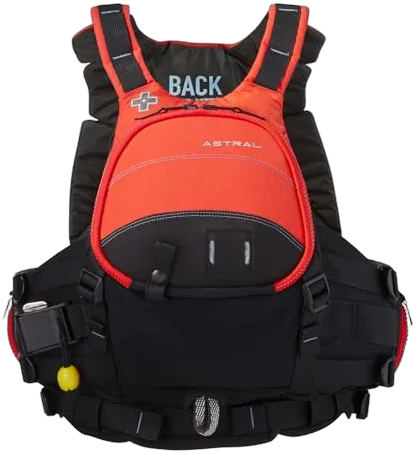
The Astral GreenJacket is widely named as the whitewater professional’s default, and the eight-strap adjustment is a big part of why. A rescue vest has to stay exactly where you put it while somebody is pulling on the ring, and eight straps is how you make that happen across different layers and different builds. The tack-stitched harness and Cordura shell are built for the same reason.
Is the Extra Money Worth It
Nobody in this category will tell you the honest thing, so here it is: the curve flattens early.
What More Money Actually Buys
Going from the cheap end to the mid-range buys you real things, and they’re all the same thing wearing different hats: the vest stops being something you’re aware of.
The foam is where most of the money goes. A budget vest is two slabs of foam with a seam. A mid-range vest is six or more smaller panels, each free to move a little against the ones beside it.
When you rotate to reach for a stroke, two slabs resist you and six panels hinge. Nothing about the flotation changed. What changed is whether your ribs spend eight hours arguing with your gear.
Venting is the second thing, and it’s the one people underrate right up until the first hot float. A foam vest is a wearable cooler with you inside it. AirMesh panels and cutouts don’t make it cold, they just let the heat leave, and the difference over an afternoon in August is the difference between wearing your vest and finding reasons to take it off. A PFD you take off is worth zero pounds of flotation.
Third: adjustment points. Six is enough to make a vest fit. Eight is enough to make it fit *you*, in the layers you’re actually wearing, which is a different problem in April than it is in July.
Going from the mid-range to the rescue tier buys you a harness. That’s the whole transaction. The flotation bump is a couple of pounds and the construction is a little tougher, but you’re paying for the belt.
If you’re not trained, that isn’t an upgrade. It’s a purchase with no return, and it comes with a snag hazard attached to your ribs.
Here’s the part that should decide it for most people: money cannot buy you fit. The most expensive vest in this article, badly sized and tightened shoulders-first, will ride up over your chin in a swim faster than the cheapest one cinched correctly. The tier ladder only matters after the ride-up test passes, and the test doesn’t care what you spent.
There’s a narrow slot in between that’s worth naming, because it’s where a specific reader actually lives: the private boater who runs hard water often, isn’t swiftwater-certified, and wants rescue-grade construction without the harness being the reason. That’s real, and it’s the one place where spending past the mid-range makes sense for a non-guide.
So, the verdict, stated flat: for most people reading this, a well-fitted mid-range Type III is the correct end of the line. Spending more is optional. Buying less is fine. The one thing that isn’t fine is buying the wrong type, and the trap there was never a cheap Type III. It’s the boat-store vest sold as a life jacket “for water sports.”
The Sensible Premium
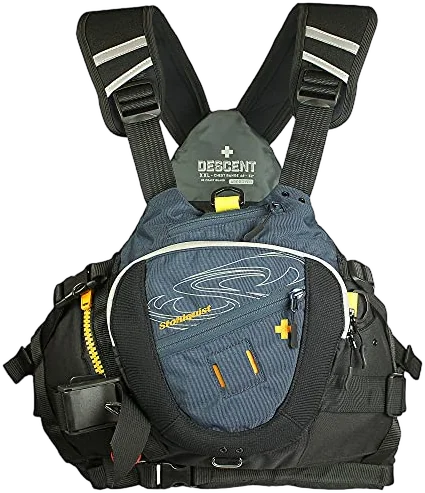
The Stohlquist Descent is the answer to the question this section asks. It’s a Type V rescue vest built around a low-profile Wrapture torso, which is Stohlquist’s way of saying they got the bulk out of it. It carries both US Coast Guard and Transport Canada approval, which matters if your season includes anything north of the border. Reviewers land in the same place consistently: rescue capability, Type III comfort.
Read the recommendation carefully though. If you’re not trained, you are still not buying it for the belt. You’d be buying it for construction and cut, and the harness comes along for the ride as a thing you leave alone until you’ve taken the course.
That’s a defensible purchase. “I bought the guide vest so I’d be safer” is not.
When to Retire a PFD That Still Looks New
The vest on the hook in the garage looks exactly like it did the day it was bought. That’s the problem. Foam dies invisibly, and the tell was never a tear.
This is the blind spot in every roundup in this category. They’ll spend two thousand words helping you choose a vest and not one sentence telling you when the one you own stopped working.
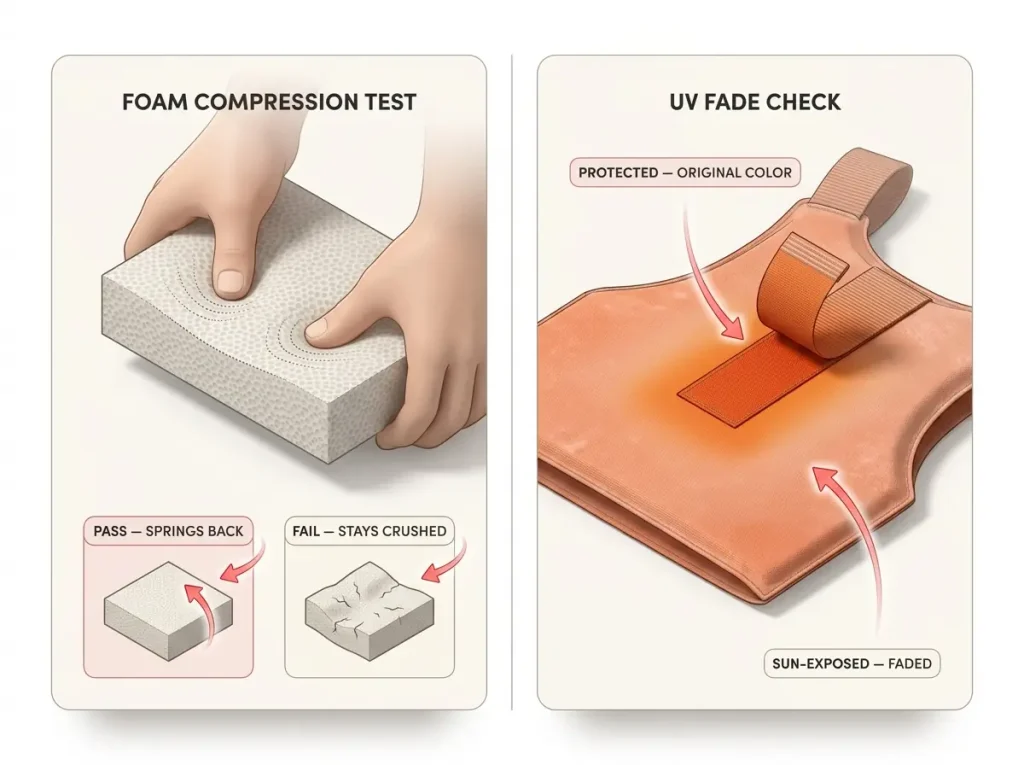
The Foam Compression Test
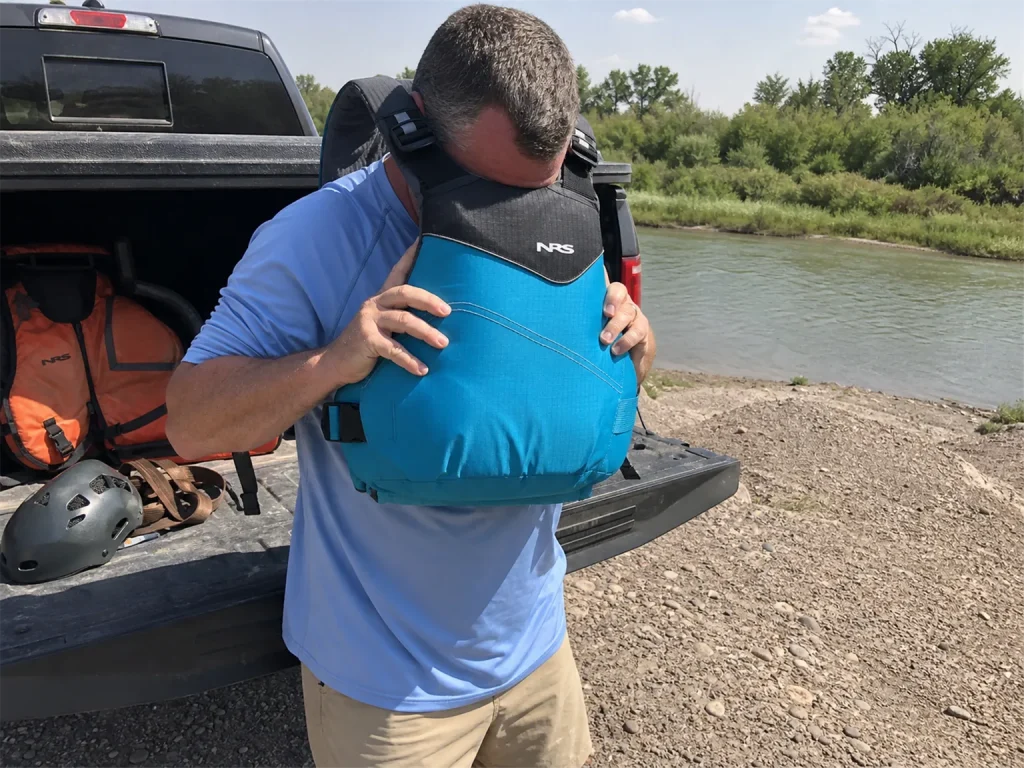
Squeeze it. Hard. Both palms, thumbs into a foam panel, real pressure.
If it springs back immediately, you’re fine. If it comes back slowly, or it feels crunchy under your thumbs, it’s done. Foam that has been compressed and soaked and dried and compressed again for years loses the closed-cell structure that makes it float, and it does that without changing color, tearing, or giving you any other warning. The crunch is the warning.
The UV Fade Check
Compare the shell color to what it looked like new. If it’s visibly lighter, UV has already been working on the fibers, and faded fabric is weakened fabric whether or not anything has torn yet.
Most vests carry their own control sample, which is the useful trick here. Look under a strap, or under the flap where a buckle sits, at fabric the sun has never touched. That’s the original color. The difference between that strip and the rest of the vest is your fade, measured against itself, with no memory required.
Run both tests on the same day every year, at the start of the season, on every vest in the garage including the loaners. The loaner vests are always the oldest, always the most faded, and always the ones you hand to the friend who has never swum a rapid before.
Buckles, Webbing, and the Calendar
Two hard stops that don’t get a second opinion: frayed webbing anywhere it bears load, and a buckle that sticks. Neither is a fix-it-later item. Both mean the vest is out of service now.
Then there’s the calendar, which is the part people resist because it isn’t about condition at all:
- Heavy users (100-plus river days a year, which is most working guides): budget a new vest roughly every 3 years.
- Weekend paddlers: every 3 to 5 years.
- Everybody, as an outer limit: 4 to 6 years in general use.
That’s not a manufacturer trying to sell you a vest. It’s the honest lifespan of foam that gets soaked, compressed, and sun-baked for a few seasons. The version of this you hear at the takeout is shorter: the vest is manky, retire it. And the tell that surprises people every time is a guide pulling a vest that looks brand new off the rack and retiring it, because it failed the crunch test and looks were never the measure.
While you’re at it, the rest of the kit is worth auditing at the same time. Same morning, same bench, one pass.
The Short Version
A well-fitted Type III is the right vest for almost every private boater. That’s the answer, not the compromise.
Fit beats spec, every time. Waist, then sides, then shoulders. Run the ride-up test before the season, not during the swim.
The rescue belt belongs to the training, not to the vest. Take the course first, then buy the harness, and never the other way around.
Now go pull the vest off the hook, squeeze the foam, and have somebody yank up on the shoulder straps in the driveway. Ten seconds tells you whether the thing you already own is still doing its job.
Frequently Asked Questions
01What type of PFD is best for whitewater rafting, Type III or Type V?
A Type III paddling vest is right for nearly every private boater. Type V rescue vests are only for people with swiftwater rescue training. The Type V’s extra flotation is real, but the quick-release harness is what you’re paying for, and that’s the part that needs a course behind it.
02How long should you keep a PFD before replacing it?
Four to six years is the outer limit in general use. Heavy users at 100-plus river days a year should replace roughly every 3 years, weekend paddlers every 3 to 5. Condition matters too: squeeze the foam and check the shell for UV fade, because appearance alone is not the measure.
03Can you use a regular boat life jacket for rafting?
No. A Type II boat-store vest is Coast Guard approved but is not built for active whitewater use. It’s bulky, it isn’t cut for a paddle stroke, and it has nowhere to mount a knife or whistle. Approval certifies flotation, not whitewater suitability.
04Do you need a rescue PFD if you are not a guide?
No. Without swiftwater rescue training, the quick-release belt is a snag hazard rather than a feature. A trained rescuer uses it to release from a tow line under load. Everyone else is better served by a well-fitted high-end Type III.
05How much flotation do you need in a rafting PFD?
A Type III must provide at least 15.5 pounds of flotation. Type V rescue vests typically run 18 to 25 pounds. More foam is not linearly safer: it helps you hold a defensive swim position, and it works against you when you’re trying to free an entrapped foot.