


In this article
The boater who bought the big four-bay expedition frame usually figures it out on the drive home, when the thing barely clears the truck bed and eats half the garage. Bigger frame, bigger logistics, and nobody warned them. Here is the honest version a river friend gives you at the ramp: the frame that fits your river and your trips is almost never the most expensive one on the page. There are three main raft frame types sorted by how you actually row, plus a couple of construction choices that matter more than the price tag. Get those right and you buy once instead of twice.
What a Raft Frame Is and the Parts That Matter
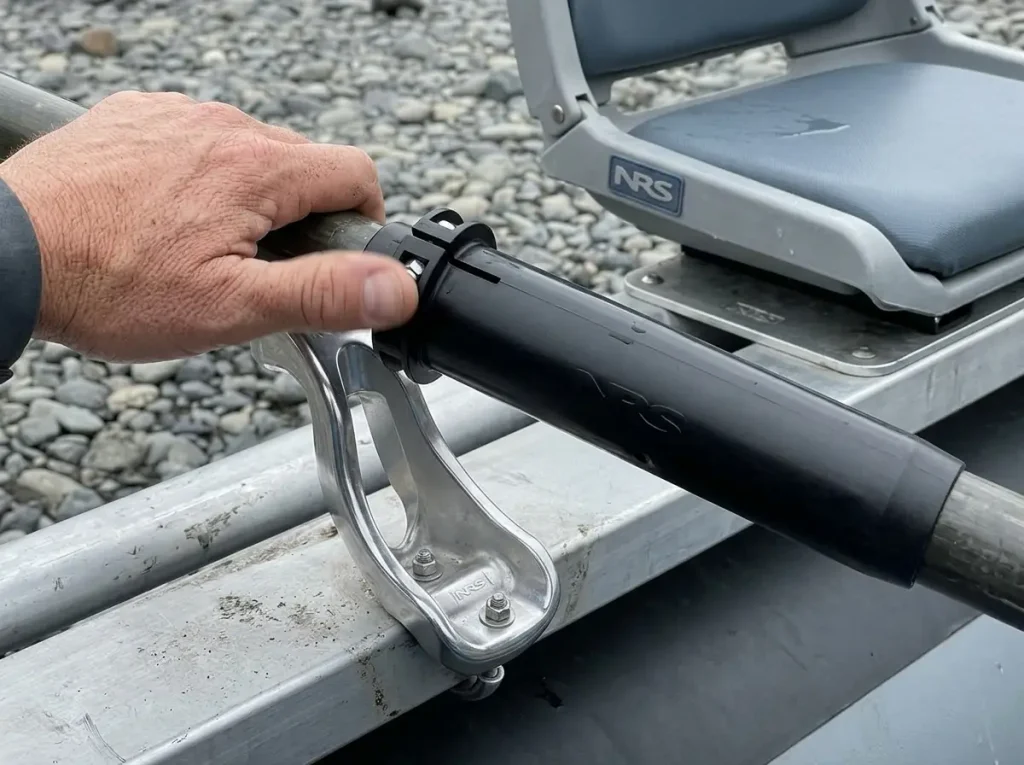
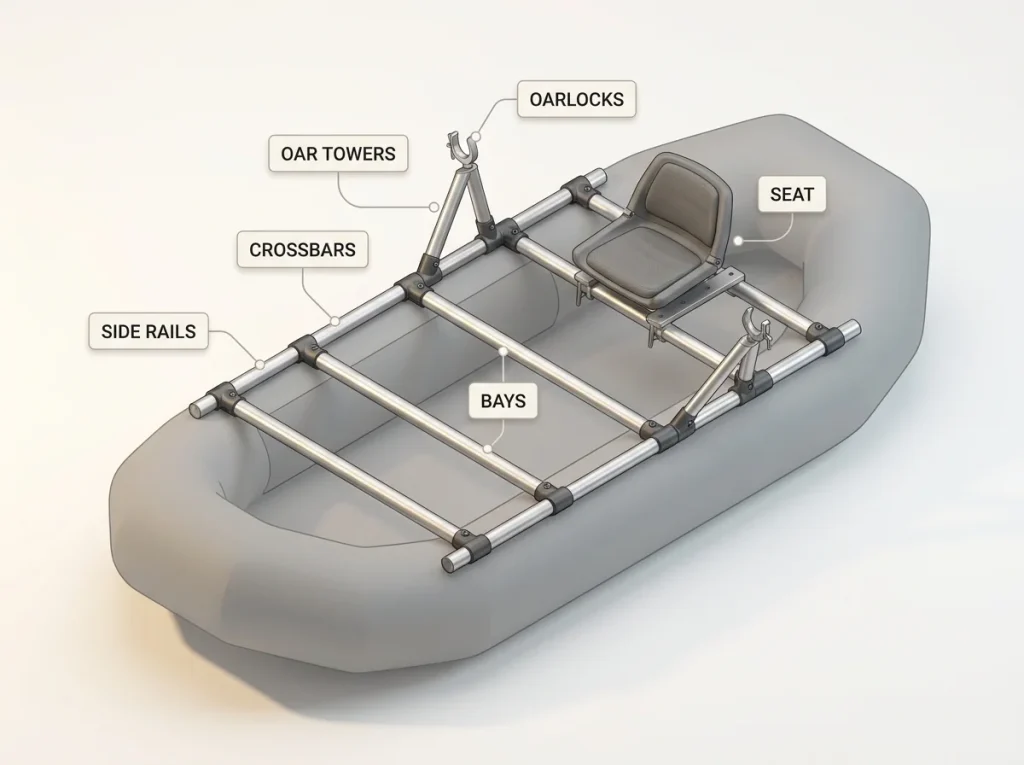
A frame is the rigid aluminum skeleton that turns a floppy inflatable into a rowable, gear-hauling platform. Oars, seats, coolers, and dry boxes all mount to it. Before you can compare types, you need the vocabulary, so let me point at the parts the way you would see them on a rigged boat at the put-in.
The Rails, Crossbars, and Bays
The long members running bow to stern are the side rails. The pieces running across them are the crossbars. The open rectangles between crossbars are the bays, and that is where a cooler, dry box, or ammo can rides. Boaters talk in bays constantly, so it pays to think in them early: a one-bay frame and a four-bay frame are two different animals.
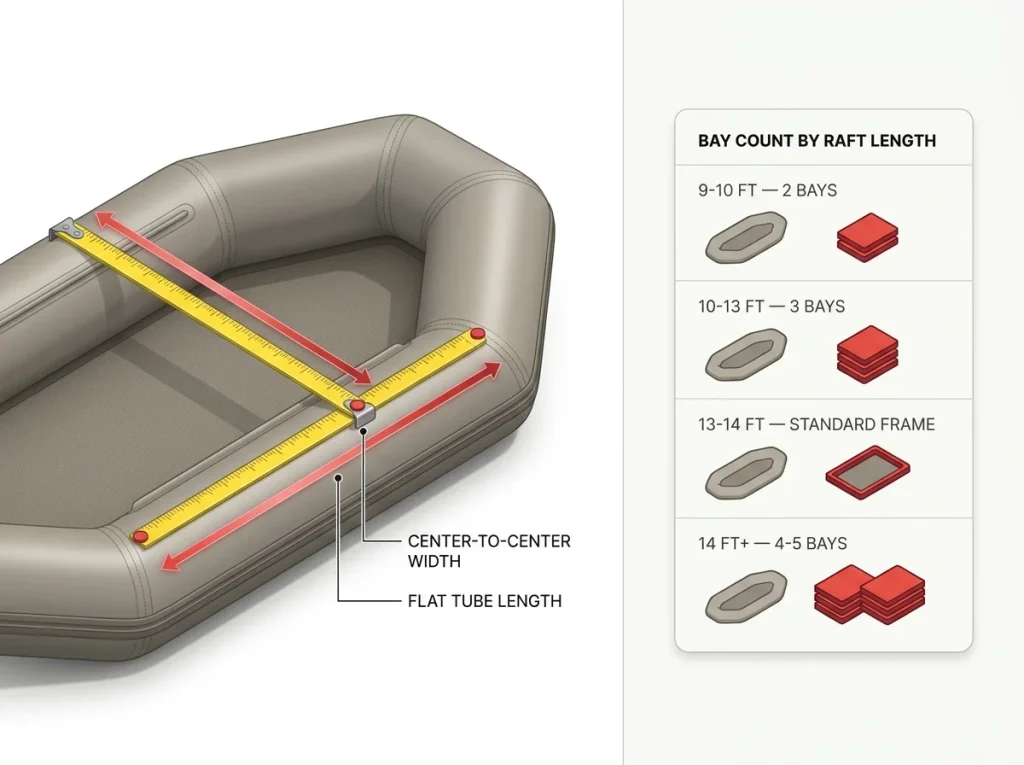
You will also hear “C-to-C” and “flat length” thrown around. C-to-C is the center-to-center width across your tubes, and flat length is the usable straight section of tube the frame actually sits on. Both come back when you size a frame, so file them now.
Oar Towers, Oarlocks, and the Seat
The oar towers (also called oar mounts) stand up off the rails and hold the oarlocks, which is where the oars pivot. This is the highest-wear contact point on the whole frame, metal grinding on metal every stroke. A hardware piece like the NRS 8 Inch Oar Mount is the standard tower that bolts to the rail, and a sacrificial NRS Molded Oar Sleeve slides onto the shaft to take the wear instead of your oar. If you want to go deeper on the pivot hardware, our guide to which oarlocks and towers actually fit your frame breaks down the fit.
Then there is the seat. A base setup runs a simple padded bench like the NRS Low Back Raft Seat mounted on a seat plate, which you can upgrade later if you start fishing.
Do You Even Need a Frame
Not every raft needs one. A paddle boat runs frameless, everyone digging in with paddles. The moment you want to row solo with oars or haul real gear, though, the frame turns the rig into an oar boat, and the frame becomes the thing everything hangs on. If you are still deciding between rigs, our breakdown of whether you even need an oar setup in the first place is the place to start.
The Three Frame Types, Sorted by How You Run Rivers
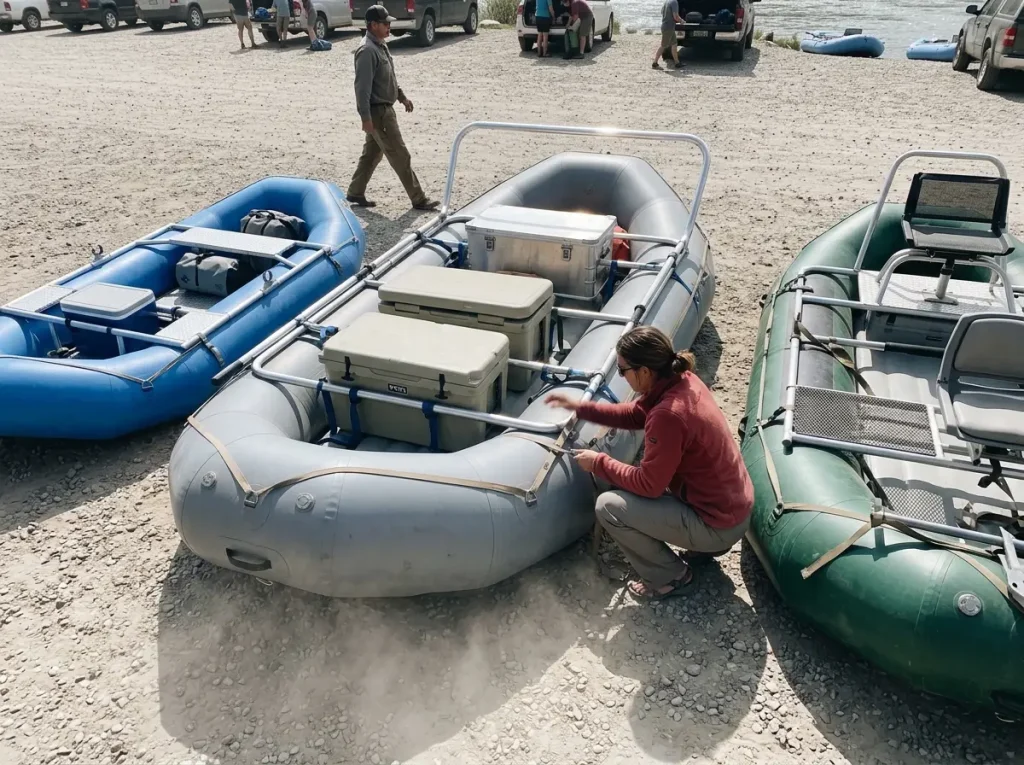
Tell me how you actually use your boat and I will tell you which frame you want. The categories are not spec-sheet trivia; they map to trip style. And this is where most first-timers talk themselves into too much frame.
Day-Tripper Frames
Light, one to two bays, easy to lift and rig. A day-tripper covers most day runs and short weekends, and it is the archetype every other frame gets measured against. It is nimble on technical water because you are not dragging a stack of empty bays through every rapid. For a lot of private boaters, this is the only frame they ever actually need.
Expedition and Cargo Frames
Three to five bays, built to haul coolers, dry boxes, and multi-day loads. This is the Grand Canyon rig, and it earns its keep on trips that fill it. More capacity means more weight and more money, so the honest question is whether your calendar actually has multi-day trips on it or just the idea of them. The same hidden cost shows up one tier over on a cataraft, which is why our look at the frame cost baked into a cataraft is worth a read before you jump sizes.
Angler and Fishing Frames
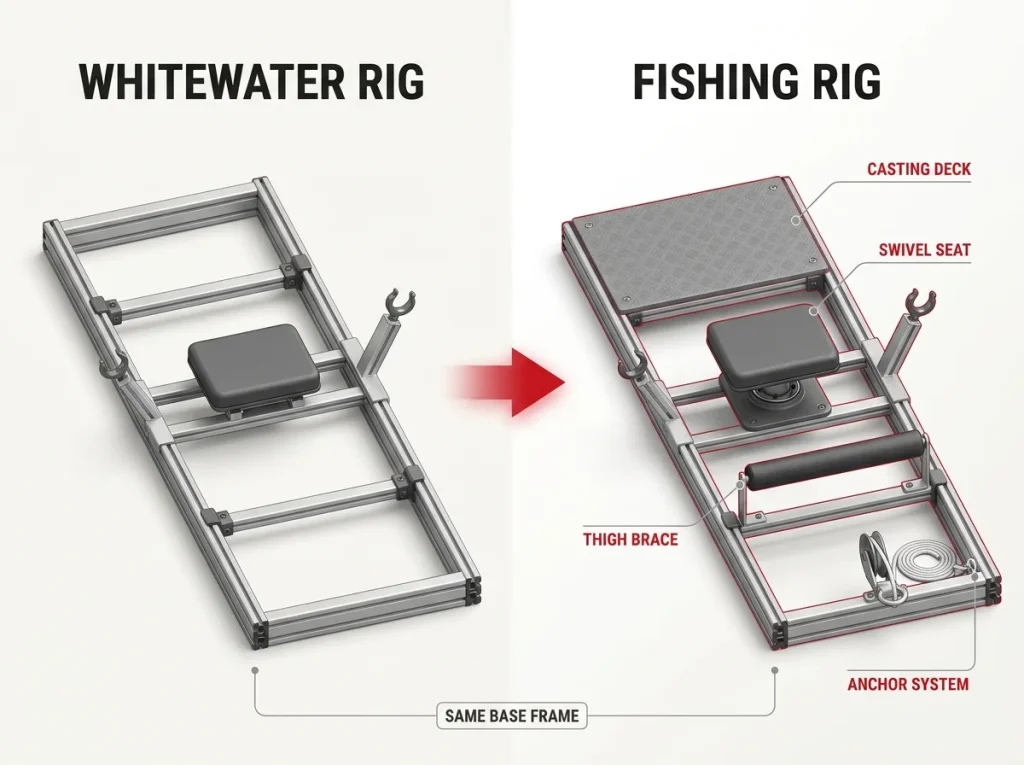
A fishing frame is a rowing base with a casting deck, swivel seat, anchor system, and thigh brace added on. It is purpose-built to stand, cast, and hold position. The good news, which I will come back to, is that you can dress a standard rowing frame toward fishing later instead of buying a dedicated one on day one.
Here is the reframe nobody in the search results says out loud: most first-time private boaters need the day-tripper and talk themselves into the expedition. Extra bays you never fill are just weight and cash you carry through every rapid. Buy for the trips you run now, not the trips you picture. If the boat under the frame is also still up in the air, the self-bailing versus bucket-boat tradeoff feeds the same decision.
If you are torn between a day-tripper and an expedition frame, count the multi-day trips you actually ran last season. Zero or one means you are shopping for a day frame with a story attached. Buy the smaller one and put the difference toward straps and a dry box.
Aluminum, Welded or Modular, Single or Double Rail
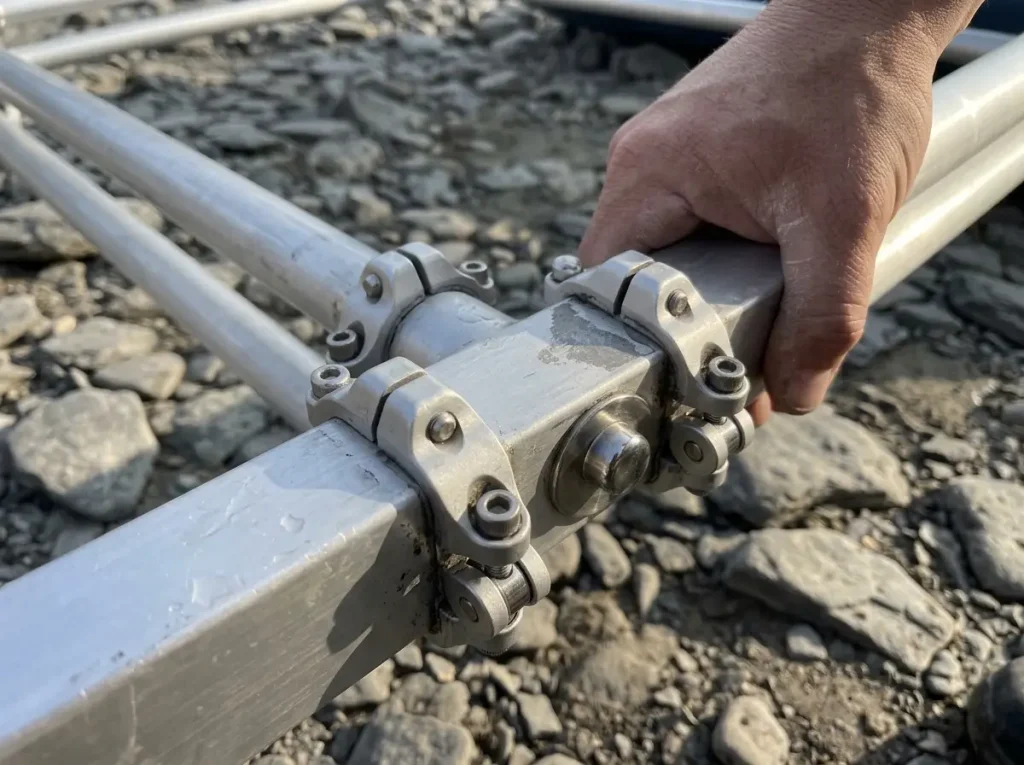
Anodized aluminum pipe is the standard material, so the real decision is not what the frame is made of but how it is put together. This is the part competitors state as neutral fact and walk past. It is worth slowing down here, because the joinery is what breaks or holds on real water.
Modular or Welded
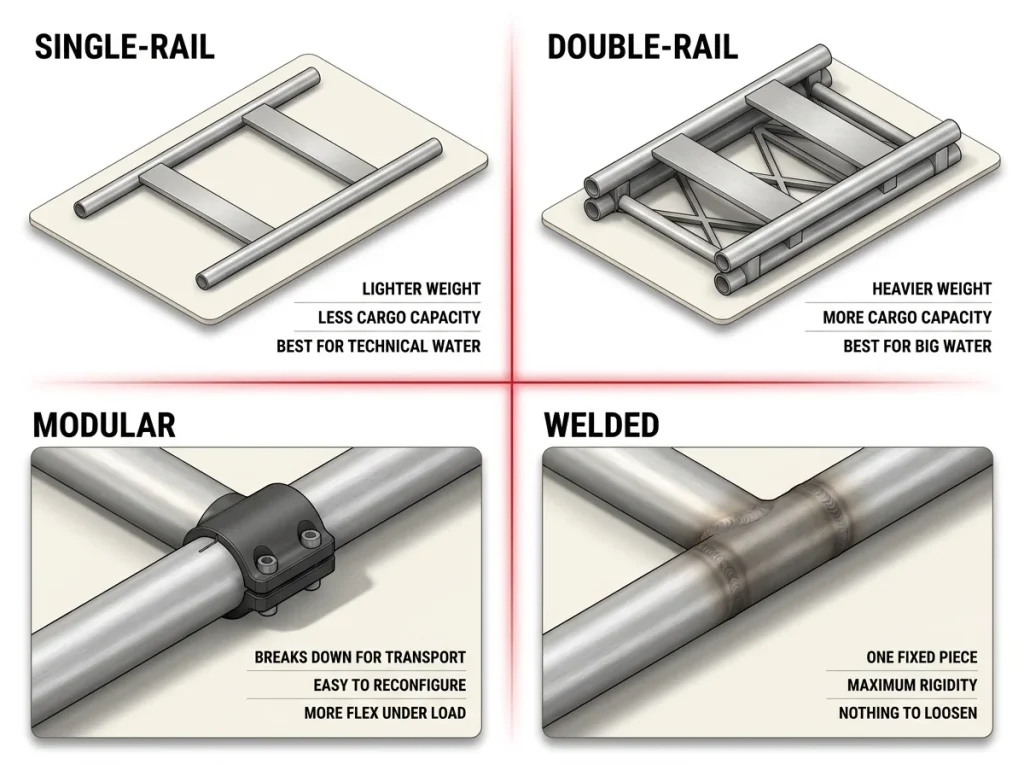
A modular frame is clamped together with fittings, the low-profile pipe clamps boaters call LoPro. It breaks down for transport and reconfigures when your needs change. A welded frame is one fixed piece, rigid and simple with nothing to loosen. Modular wins on flexibility and travel; welded wins on dead simplicity. The manufacturer breakdown of what actually separates a modular frame from a welded one is a straight reference if you want the fitting-level detail.
Single-Rail or Double-Rail
A single-rail frame uses one rail per side and stays light. A double-rail frame adds a second rail, which carries roughly fifty percent more weight and gives you a wider, more stable strap deck. That capacity is not free. The extra metal is weight you push through every rapid, so a double-rail only pays off if you are hauling enough to justify it.
What Actually Flexes and Fails on the Water
Here is the field truth. A frame that is too rigid can pop rivets and crack welds over time on big, pushy Class IV water, because it fights the load instead of moving with it. Some builders deliberately use quick-release pin joints at the corners so the frame flexes and articulates under stress, the same logic as a suspension bridge built to sway. Match the build to your water: a technical low-volume creek or a bouncy Class III run rewards light with a little give, while big water rewards the stability of a double-rail deck. It is the same weight-versus-durability tradeoff rafters argue about with wood and carbon oars, just applied to the frame under you.
Center Mount or Stern Mount, and Who Each Is For

Where the oars and rower sit changes how the boat handles. This is why the commercial guide on your last trip sat up high in the back, and why your private boat probably should not be rigged that way.
Center Mount
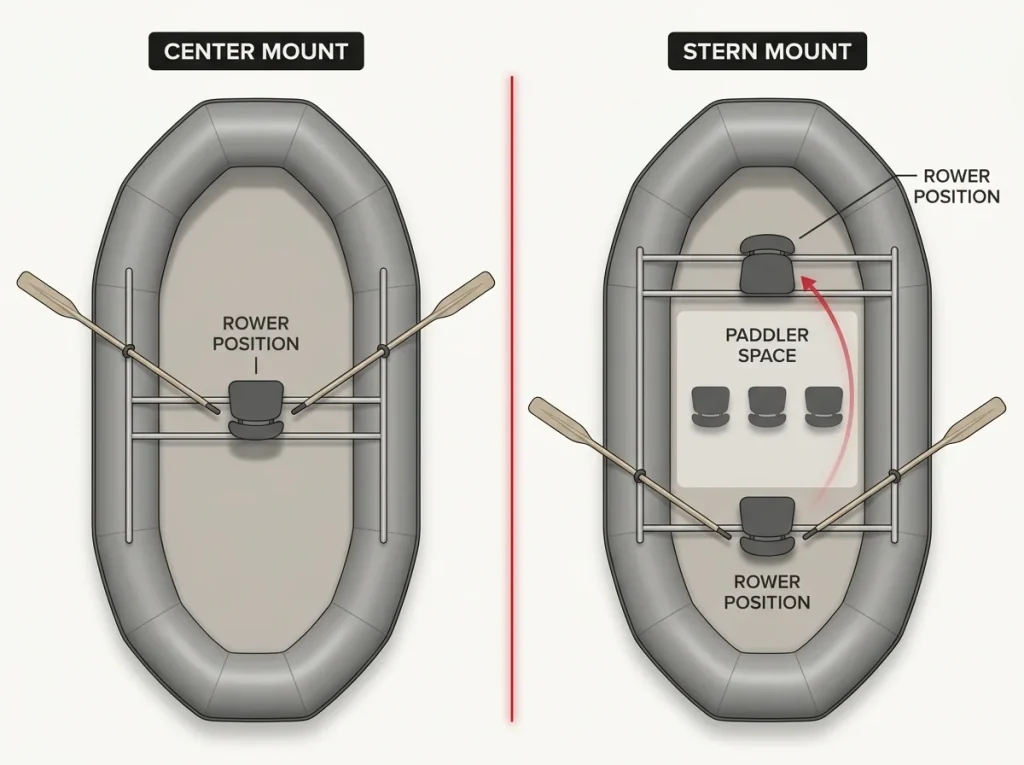
A center-mount frame puts the oarlocks at the raft’s pivot point. It is the standard for solo rowing and heavy multi-day loads because it gives you the most control per stroke. If you are rowing alone with gear, this is the default, and it is the default for a reason.
Stern Mount
A stern-mount frame puts the rower’s seat high on the back tube with paddlers up front. It is the classic commercial day-trip setup because the guide needs eyes on the clients. The tradeoff nobody spells out: stern mount loses back-ferry ability and bleeds rowing power into the raft’s rocker instead of turning the boat. A private boater without a paddle crew usually does not want that.
Picking by Who’s Aboard
The choice comes down to your crew. Rowing alone with gear points you to center mount. Running a paddle team and steering from the back points you to stern. If you tend to run family trips with a paddle crew of kids up front, a stern-mounted paddle frame keeps their space open, which is the one case where it genuinely earns its place on a private boat.
Sizing a Frame to Your Raft Without Guessing
Frame size follows raft size, not trip length. A ten-footer does not need a Grand Canyon frame just because you are out for a week. Get the measurement right and everything else falls into place; get it wrong and the frame never seats properly.
Measure the Boat, Not the Spec Sheet
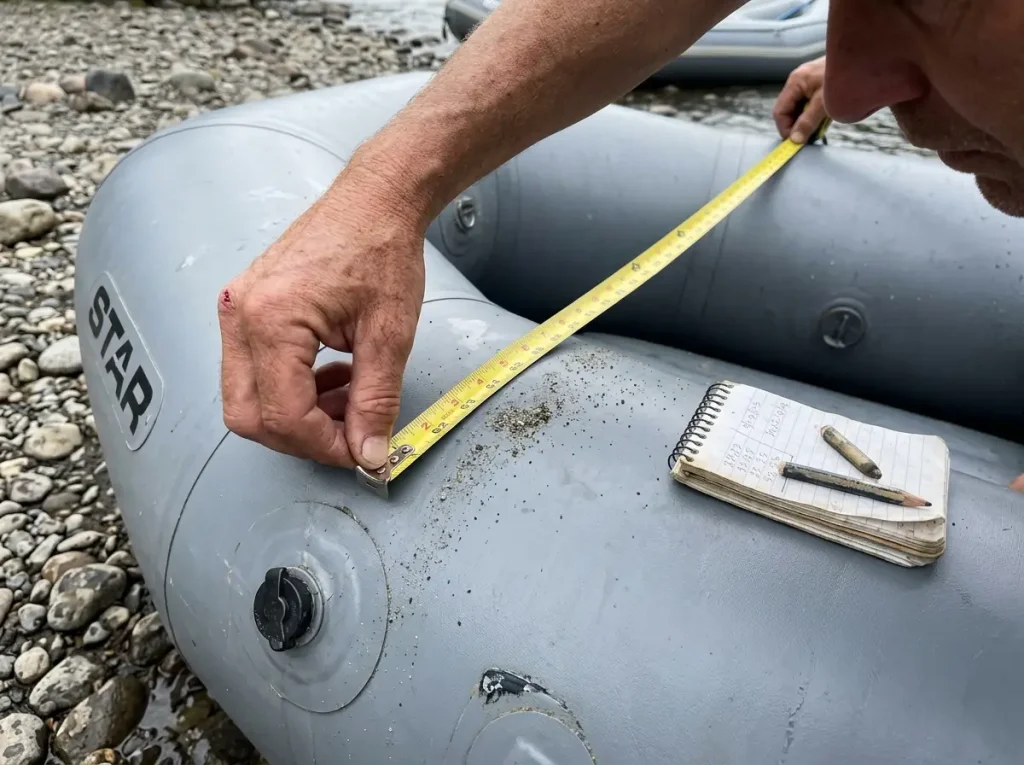
Measure your center-to-center width, which is the raft’s width minus one tube diameter, and your flat tube length. The most common mistake is ordering off the raft’s advertised length, because spec-sheet numbers rarely match the actual boat. The frame-basics reference most private boaters end up cross-referencing anyway walks the same C-to-C method. Start from your raft’s actual size and work up to the frame.
Bay Count by Raft Length
Bay count scales with raft length. Roughly two bays for a nine-to-ten-foot raft, three bays for ten-to-thirteen, and four to five for fourteen feet and up. Standard frames fit thirteen-to-fourteen-foot rafts, smaller frames go on nine-to-ten-footers, and sixteen-to-eighteen-foot frames go on expedition rafts. Buying more bays than your raft length supports just adds unused weight.
Where Tube Pressure Throws You Off
Tube diameter and inflation pressure both move your C-to-C number. A tube that is too soft throws the measurement off, so take your numbers off a properly inflated boat, not one that has been sitting slack in the sun.
When you buy a used frame, match width first. Width is much harder to change than length, so find one close to your center-to-center number and adjust the length after. A frame that is an inch off on width never sits right no matter what you do to the rails.
The Fit Details That Actually Keep You Safe
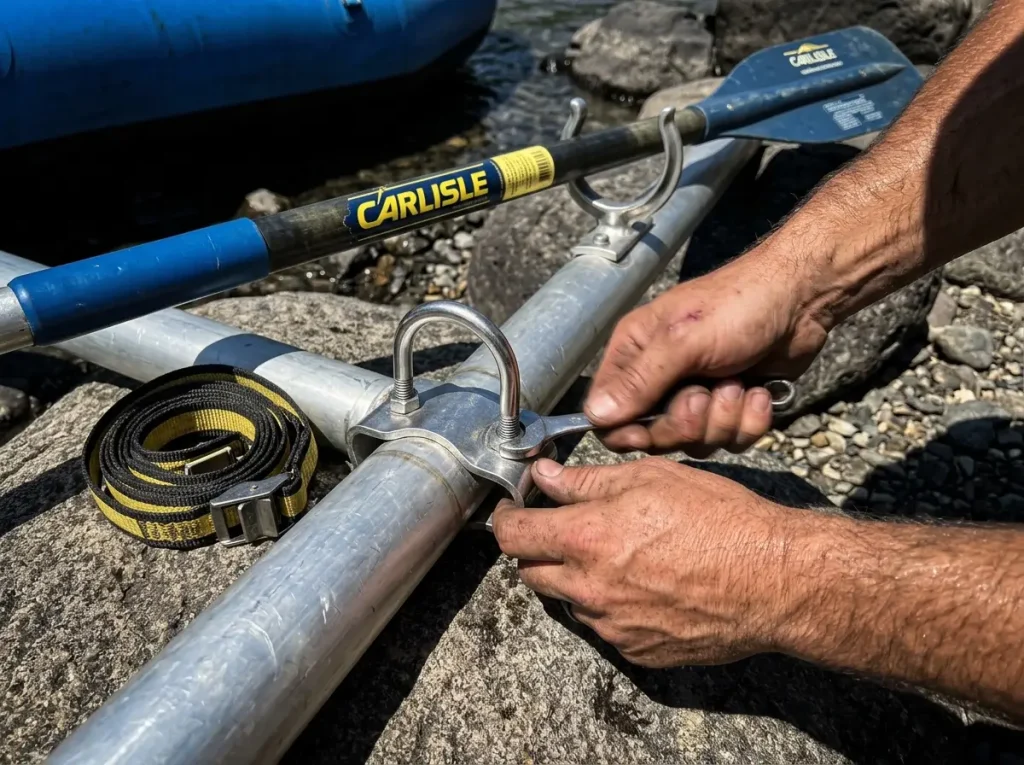
This is the section competitors bury in a bullet point, and it is the one that matters most. A frame that does not fit right is not a comfort problem. It is how people get hurt.
The Casting Deck Gap
A casting deck, or any deck panel, has to fit its raft chamber exactly. Leave a gap and you have created a spot where a foot can drop in while the boat is moving, which is a foot entrapment mechanism, not sloppy carpentry. American Whitewater’s safety code, the standard U.S. river runners reference for entrapment and rigging hazards, treats entrapment as one of the real hazards on moving water, and a loose deck edge is exactly the kind of gap it warns about. Your floor type also changes how the deck fits, so account for it before you cut anything.
Fittings That Work Loose
Oar towers, kick bars (foot braces), and stainless steel U-bolts that are not torqued and checked can work loose in rapids. A fitting that dislodges mid-rapid is the failure nobody wants, and it is entirely preventable with a wrench and two minutes.
Strap Tails and the Pre-Launch Check
Loose strap tails left hanging are a cited entanglement hazard. Daisy-chain the excess instead of letting it dangle. The habit that ties it all together is the pre-launch walk-around: check every fitting, torque every U-bolt, clear every loose tail before you push off.
Run the same two-minute walk-around every launch, in the same order: oar towers, crossbar U-bolts, seat mount, deck fit, strap tails. Doing it the same way every time is how you catch the one fitting you forgot to snug, instead of finding it loose in the meat of the rapid.
What Your First Frame Really Needs (and What to Skip)
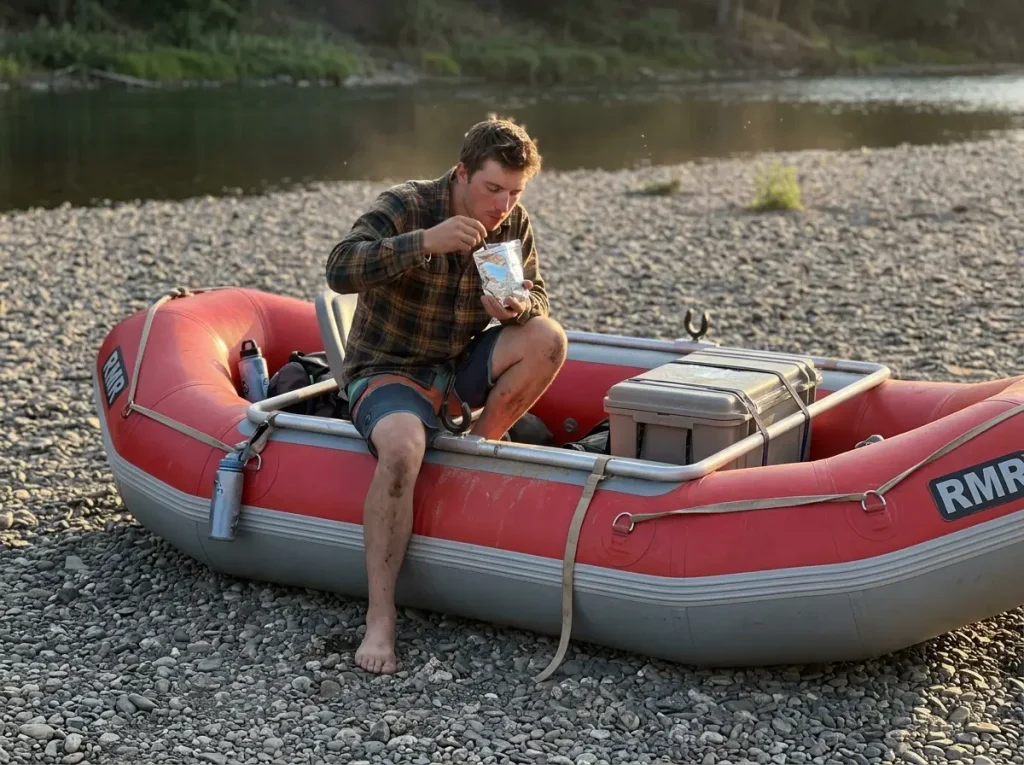
Here is the anti-sell heart of it. A first frame does not have to be the expensive one, and talking you out of over-buying is the whole point of this article.
What a First Frame Actually Costs
Pre-configured minimalist day frames sit at the entry tier. Custom three-to-four-bay expedition builds run well over double that. A basic one-to-two-bay frame is a complete, safe, functional setup for day and short-weekend trips, and nothing about your first season on a private raft requires the top-tier build. The biggest cost driver is add-ons: diamond-plate decking alone can more than double a mid-tier frame’s price over a plain marine-grade plywood deck, and all it buys is a walkable deck, not more strength.
What You Can Skip
On frame one, skip the extra bays you will not fill, the diamond plate you do not need to walk on, and the captain’s chair. The expedition build only pays off once you are actually running trips that fill it. The same budget-first logic applies to the boat under the frame, where the pool-toy trap catches a lot of first-timers.
Buying to Grow Into, Not Out Of
For a beginner, a basic single-rail modular frame you can reconfigure later beats locking into a big welded rig before you know your trips. Buy the first raft you will not outgrow in a season and pair it with a frame that leaves room to change your mind. The same “carry what the trip needs” thinking runs through what you pack by trip type, and the frame is no different.
Buying Used or Building Your Own Frame
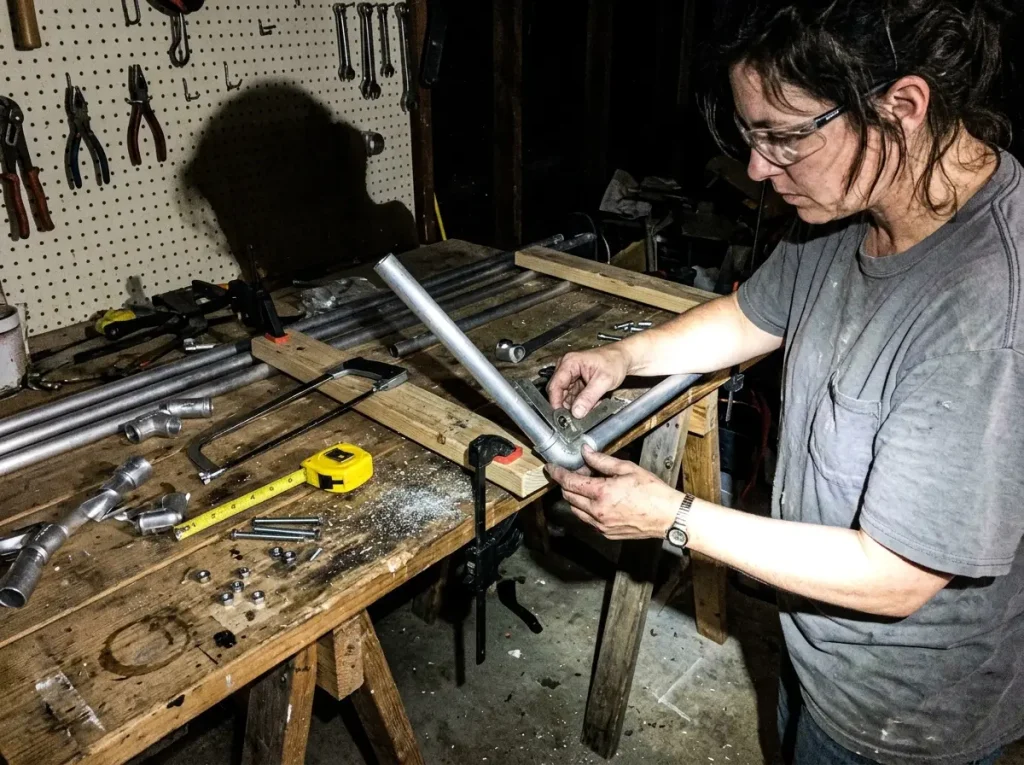
The used and DIY paths barely get a mention in the search results, and both are legitimate ways into your first frame, not stunts.
Buying a Used Frame
Used NRS frames circulate often and are easy to modify. Because width is harder to change than length, match width first when you buy used, then adjust the length to suit. You inherit someone else’s sizing decisions, so measure their frame against your boat before money changes hands.
Building Your Own
DIY builds range from full aluminum tube-and-LoPro rigs down to genuinely bare-bones versions with electrical-conduit sides and fence-steel crossbars. Even a simple wood two-by-six frame is strong enough to sit and stand on for a first setup. A build saves money but costs time and tools, which is a fair trade for a lot of boaters.
When Custom Is Worth It
Going custom or welded is worth the jump once you know your river and your loadout and want one rig built exactly for it. Not before. Do the miles first, then commit. Once the frame is built or bought, the full dry-box rigging walkthrough picks up where this leaves off.
Rigging and Converting Your Frame for Fishing
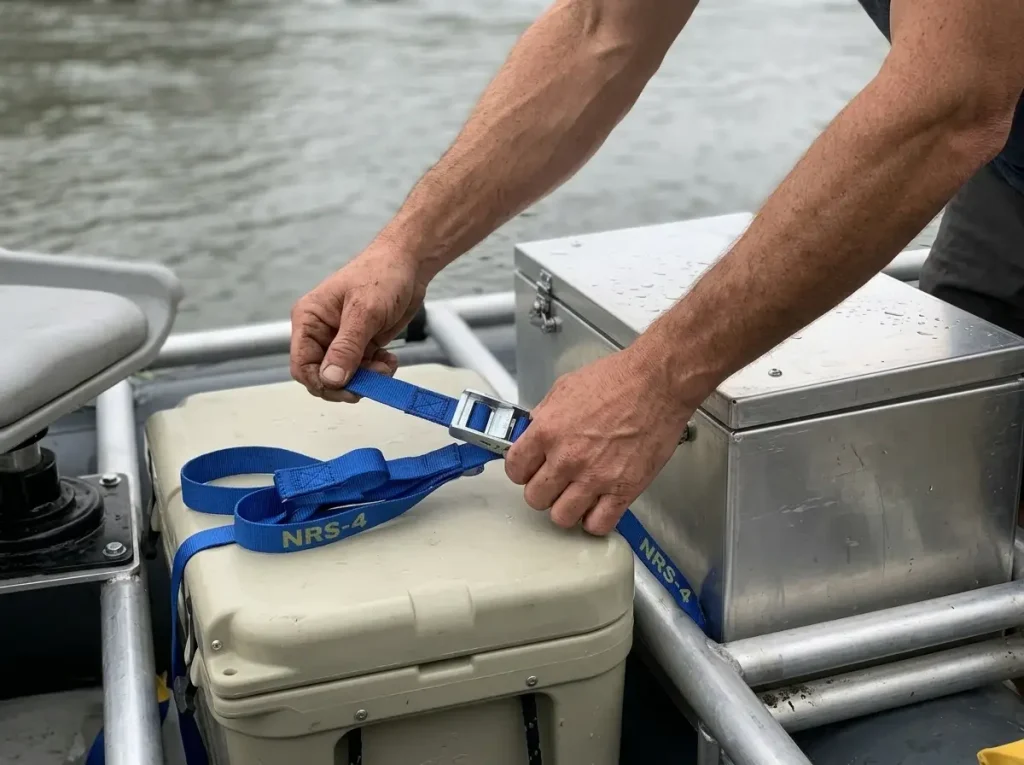
One frame can do two jobs. Here is how gear actually straps into the bays, and how to add a fishing setup without buying a second frame.
Strapping Gear Into the Bays
Bays hold coolers and dry boxes, secured with rigging straps run through the frame’s D-rings. The NRS 1in Loop Strap is the default for lashing a cooler into a bay, and a dry box bolts to the rails or crossbars with adjustable hardware like the NRS Adjustable Drybox Mounts. If you need the box itself, the Bosski River Rafting Dry Box is a rotomolded unit sized to sit in a frame bay, which is worth flagging because complete frames themselves are bought direct from manufacturers and dealers rather than through Amazon. That is normal for this category, not a red flag, and the accessories are what you outfit the bare frame with. For picking strap length and working load, our cam strap guide covers the details.
Converting to a Fishing Rig
Turning a standard three-bay single-rail whitewater frame into a fishing rig means bolting on a front thigh brace, an anchor system, and a casting deck, plus a swivel seat. A kit like the NRS Swivel and Plates for Padded Raft Seats is the buyable version of the “add a casting seat” step. The base frame, side rails, and crossbars all carry over unchanged, which is the whole point: you are dressing the frame you own, not replacing it.
The One-Frame Approach
A bolt-on fishing conversion for a season beats a dedicated angler frame until you know you fish more than you row. Run it both ways, see which one your weekends actually lean toward, and let that tell you whether a purpose-built angler frame is worth it later.
Rig your straps with the buckle on the outside of the raft, and sort straps by length before the put-in instead of grabbing from a jumbled bag. Both habits save real minutes at the ramp and make re-tightening mid-trip far faster.
The Bottom Line on Picking a Frame
Pick your frame type by how you actually run rivers. Day-tripper for most boaters, expedition only when you fill the bays, angler when you fish more than you row. Construction and fit matter as much as the category, so match single or double rail and modular or welded to your water, and check every fitting before you launch. And a first frame does not need to be the expensive one: buy basic, buy used, or build it, then reconfigure as your trips change.
Before you shop, measure your boat’s actual center-to-center width and let your real trips, not the catalog, pick the frame. From there, where the frame fits in the rest of your kit rounds out the setup.
Frequently Asked Questions
01What is a raft frame made of?
Most raft frames are anodized aluminum pipe joined with either clamped modular fittings or full welds. Budget and DIY builds sometimes use electrical conduit or wood, but aluminum is the standard for its strength-to-weight.
02What is the difference between a whitewater raft frame and a fishing raft frame?
A whitewater frame is a rowing base of rails, crossbars, oar towers, and a seat. A fishing frame adds a casting deck, swivel seat, anchor system, and thigh brace on that same base, so you can convert one into the other without a second frame.
03How much does a raft frame cost?
Pre-configured minimalist day frames sit at the entry tier, while custom three-to-four-bay expedition builds run well over double that. Diamond-plate decking and custom components are the biggest cost drivers, so a basic frame covers most first-timers for far less.
04How do I know what size raft frame I need?
Measure your raft’s center-to-center width (tube to tube, not the advertised length) and flat tube length, then match bay count to raft length. Roughly two bays for nine-to-ten feet, three for ten-to-thirteen, and four to five for fourteen and up.
05Do all rafts need a frame?
No. A paddle crew runs frameless. You need a frame once you want to row with oars, carry a rower solo, or haul multi-day gear, because it is the platform that oars, seats, and cargo all mount to.